TIMX SCM Overview
TIMX SCM Login
A
valid username and password are required to access TIMX from your desktop.
Generally, the username consists of the end-user's first initial and full last
name and the password is at least six characters in length. Each
end-user will be given the capability to select their own password, which must
conform to the password creation rule as stated earlier. Sharing of
passwords is strictly forbidden.
1. From Windows, double click on the TIMX SCM icon.
2. In the Username field, enter your first initial and full last name.
3. In the Password field, enter your current password.
4. In the DataBase field, enter TIMX.
5. Click on the Connect tab or press the enter key to view the Main Menu screen.
6. If an option from the menu are not accessible based on your role, it will be colored gray.
7. Click on the available menu to select and initiate the desired screen or function.
8. To exit from the program, select the Exit menu.
HS Search Panel
HS Search Panel is used to search enrolled, cancelled, expired, inactive and active accounts.
The following are steps to conducting searches in TIMX.:
1. Select Enrollment and HS Search Panel at the
Menu screen, to display the HS Search Panel screen.
Icons and Menus
Icons are context sensitive and will only be activated where available.
1. Left arrow selects next
record
2. Right arrow selects
previous record
3. Left double arrow selects
first record
4. Right double arrow selects
last record
5. Completes search query
6. Deletes search query
7. Calendar allows for date
selection
8. Prints to designated
printer
9. Initiates Enrollment/
Inserts field for new record
10. Red X deletes a record
11. Diskette saves record/file
12.Open Door exits the screen
File Search
Search Field Descriptions:
Application# | The number for a pre-loaded application that has not been converted to a warranty. |
|
Contract ID# |
Also known as the warranty number, which is provided to the customer after enrollment. |
|
Loan# |
Provided by the mortgage company, generally scrabbled, but can also be entered as the true number. |
|
First/Last Name |
The member’s full name. |
|
Address/ Zip Code/City/State Code/Home Phone |
The property’s full address, city, state, zip code, and the member’s primary contact phone number. |
|
Privacy# |
A number created by the Marketing department and the client to initiate and retrieve billing |
|
Reservation# |
A number created by the Marketing department and the client to initiate and retrieve billing |
Account Search Process
- Enter the desired search query (e.g., street address and zip code, first and last name etc.).
- At least two (2) search criteria should be used to reduce the query time and information retrieval.
A (%) wild card after a few characters of the last name field will list all related names that begin with those letters (Mar% = Martin, Marshall, etc.) - To initiate the search, type the selected search criteria, click on the search icon.
- For an Address Search (preferred search), enter the first 3-4 characters of the address and the zip code.
- Begin your search by choosing a contract status from one of the radio buttons below.
- Radio Button Descriptions:ApplicationDisplays only applications, not warrantiesWarrantyDisplays enrolled productsAllDisplays all productsActiveDisplays ACTIVE productsInactiveDisplays INACTIVE products.ExpiredDisplays expired products.CancelledDisplays cancelled productsStart DateDisplays the products from the date field beside it.
- The record(s) will appear in the description columns as follows:ApplicationDisplays only applications, not warrantiesWarrantyDisplays enrolled productsApplicationApplication numberContract IDPlan/Warranty numberRnwlRenewal YearAddress, City, State, Zip (separate columns)Property AddressFirst Name, Last Name (separate columns)Member’s nameStatusShows the status of the planCell CodeIdentifies the plan typeCampaignIdentifies the associated campaignPurchase TypePurchase or warranty type:Buyer Direct Warranty (BDW)Sellers Home Warranty (SHW)Open Direct Warranty (ODW)Buyer Conversion Warranty (BCW),New Home Warranty (NHW)Referral Product (HSP)PlanPlan Name/Plan TypePromoIdentifies if the plan includes a promotion.
- To view, double-click or press Enter on the desired record.
- The HS Enrollment Form screen will display.
Enrollment Form/Pre-Loaded Applications
The Enrollment Form is where the application for a new warranty can be entered or downloaded, pending conversion to the HS Enrollment Form.
Pre-Loaded Applications are used by:
- HMS Affiliates, Enrollment and Accounting Associates.
- Third-party clients download warranty applications, pending request for enrollment.
Why is This Done?
An application is used when a customer is eligible for special products offered through the financial channel, or when they are not yet ready to commit to purchasing a warranty or property. It allows them the opportunity to complete the purchase once the property closes or after they have reviewed the offer.
What Happens After an Pre-Loaded Application is Entered or Downloaded?
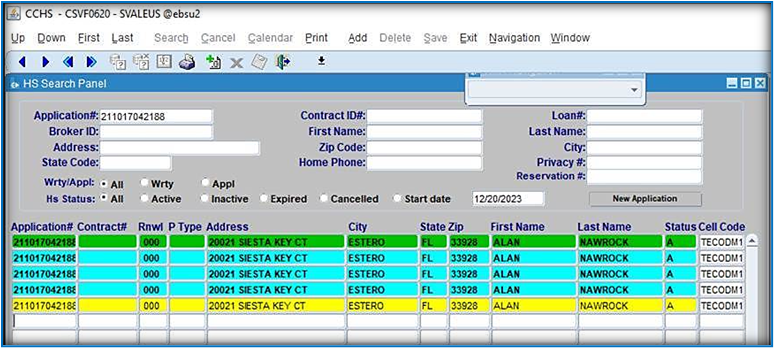
When you perform an address search in TIMX, the pre-loaded application information appears in
the HS Search panel, highlighted with three different colors.
 These applications have not been converted to a warranty and will not have a contract number.
 They will not appear in any other database.
Conversion
- A Real Estate Enrollment or a Support Services Associate can convert applications to an
active warranty after the closing date has been verified.
- A
Retention Associate will convert the application upon request from the
homeowner to be enrolled.
To convert the warranty, double-click the applicable record. This opens the Application Entry Form. Follow the Pre-Load Procedures to complete the conversion/enrollment.
Related Articles
R-410A Condenser Conversion Guidelines
Click the Attachment below to download Job AidEntering Notes- TIMX
Entering Notes Notes are entered to document every contact with a customer or any other party. In TIMX SCM, the Communication History Log is used to record notes and related procedural dispositions, and to review historical notes. To review ...Customer Engagement Center (CEC) Overview
Customer Engagement Center (CEC) Overview Within the Customer Engagement Center (CEC), access to various customer and contract information is available. Customer Information CEC Customer Information The CEC Customer Information area includes the ...Replacement Deductible Outbound Call Flow
Replacement Deductible Pre-Call Checklist Review contract and all research notes: Is there a claim under review? Is the Service Type listed as “Replacement”? Is there a replacement deductible button in Zoho? Is there a Research Completed Note with ...Customer Service Talking Points
Purpose Provide agents with approved empathy statements, response options, and communication guidance for common customer scenarios. These responses help ensure consistent, professional, and customer-focused interactions while setting clear ...